
Learn how to create a graffiti using Paint.NET. The first step is to write text on the wall texture, give oil painting effect, give frosted glass effect that resembles handwriting spray paint, then doubled the text layer. We give the topmost text with Multiply blend mode and the bottom text with Overlay blend mode.

Final result.
Step 1: Download Font For Graffiti
Go to the website www.dafont.com, then click the type of font Script> Graffiti. Please download graffiti font that you like. After downloading, you will get a zip file format.
Step 2: Extract Then Install Font
Extract the font file using 7zip application. You will get a file with TrueType format (.ttf). Right-click this .ttf file and then click Install. Fonts are now installed on your Windows Operating System.
Step 3: Open Texture Wall in Paint.NET
Choose File> Open, click the picture wall texture and then click Open. For this Paint.NET tutorial, I'll use this wall texture that I downloaded from Pixabay.

Step 4: Type Your Text
Choose Layers> Add New Layer. Click the Text Tool in the Tool panel. Select a color on the Colors panel. Click on the document and then write your text. Instead of using text, you can use eps file in Photoshop.
Step 5: Adjust the Text Size and Position
Decrease the size of the canvas by pressing Ctrl + - repeatedly. Click the icon Move Selected Pixels. Click on the words and then drag it to position it. Click the corner of the selection box and then drag out to enlarge it. Press Enter when done setting it. Please return the size of the canvas by choosing View> Zoom to Window.
Step 6: Add Stroke
To add a stroke in writing, we will utilize the glow effect. Choose Effects> Photo> Glow. Slide the Radius slider to a value of 1 and a Brightness slider to -100. Click OK. Then repeat the glow effect give up several times by pressing Ctrl + F. I will press Ctrl + F as many as 10 times.

Step 7: Add 3D effect
To give a 3D effect I will double the Text then change the color to black and white using Hue Saturation adjustment. Choose Layers > Duplicate Layer.

Select Adjustmens> Hue Saturation and Lightness slider to -100. Now writing is already black. We will move it using the Move Selected Pixels to give a 3D effect.

Click the Move Selected Pixels icon and then click the document and slowly sliding towards the bottom right. While pressing the Shift key, click the text layer and select Layers> Merge Down.

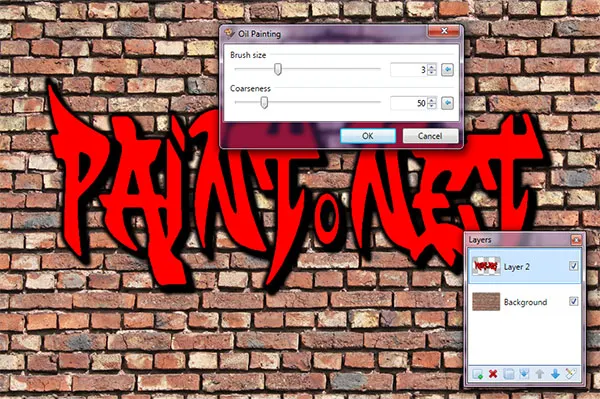
Step 8: Apply Oil Painting Effect
Select Effect> Artistic> Oil Painting. Please adjust the brush size and coarseness then click OK.
Step 9: Apply Distort Frosted Glass Filter
To give effect paint paper, choose Effects> Distort> Frosted Glass.

Step 10: Change Blend Mode to Overlay
Double-click the Text Layer and change the mode to Overlay blend.

Step 11: Duplicate the Text layer
Select Layers> Duplicate Layer, and then change the blend mode to Multiply.

There you have it! Tutorial How to Make Graffiti With Paint.NET

No comments:
Post a Comment